Bunny.net CDN Configuration for Content Replacement
This guide explains how to configure Bunny.net as a CDN in front of your broadpeak.io services for a Content Replacement workflow.
In Using broadpeak.io with a CDN we explain the reasons why you need to use a CDN in front of your broadpeak.io services in order to deliver your manipulated streams in the most optimal and efficient way.
In this playbook, we'll look at a couple of examples and illustrate how to configure it with the Bunny Video CDN, for a Content Replacement application.
Prerequisites
You need to be familiar with how to configure a PRODUCTNAME Content Replacement service first. You'll find other playbooks in the "Getting Started" section of our documentation, as well as in the present "Playbooks" section.
For expediency, the examples in this playbook will use the same sources as those Getting Started articles.
Specifically, we'll use https://origin.broadpeak.io/bpk-tv/bpkiofficial/hlsv3/index.m3u8 (one of our default samples) as the source, from which - in this case - a Content Replacement service has been created, the URL of which would look like https://stream.broadpeak.io/a3eb043e7bf775ded159a8940be5e720/bpk-tv/bpkiofficial/hlsv3/index.m3u8.
Rules
The primary aspect of configuration for the CDN relates to routing. In an ABR stream, there are one or multiple manifests or playlists, and multiple media segments that the player will request in order to render the stream. The player connects to a single CDN, which needs to know where to send those requests. So it needs to be given a set of rules to follow. Those rules will be somewhat dependent on the type of service you are implementing.
For a Content Replacement service, you will need:
- Rules that define how to direct manifest requests to broadpeak.io
- Rules that define how to direct segment calls for the base live stream to its origin (ie. the server that stores that original packaged content)
- One or more rules to direct segment calls for the replacement assets to their respective origins.
Step 1 - Common Rules
Create Pull Zone
To start with, let's get terminology out of the way. In AWS parlance, we are setting up a Distribution. It defines a set or Origins, and Behaviors that define how requests coming to the distribution are routed to those Origins.
So, that's what we'll do.
Minimum functional configurationThere are dozens of settings that can be defined with Cloudfront. It's not the role of this playbook to explain them all. We'll concentrate on the minimum set to successfully define a production-ready distribution with the samples that we provide for tests.
Some of the settings (in particular caching rules, TTL, TLS version, etc.) may also need adjusting based on your own Origin servers and typical CDN configuration needs.
Note also that the example concentrates on browser-based streaming into common web video players. Other players may require additional and specific settings.
If something isn't behaving as expected, don't hesitate to contact our Support staff at [email protected].
So, that's what we'll do.
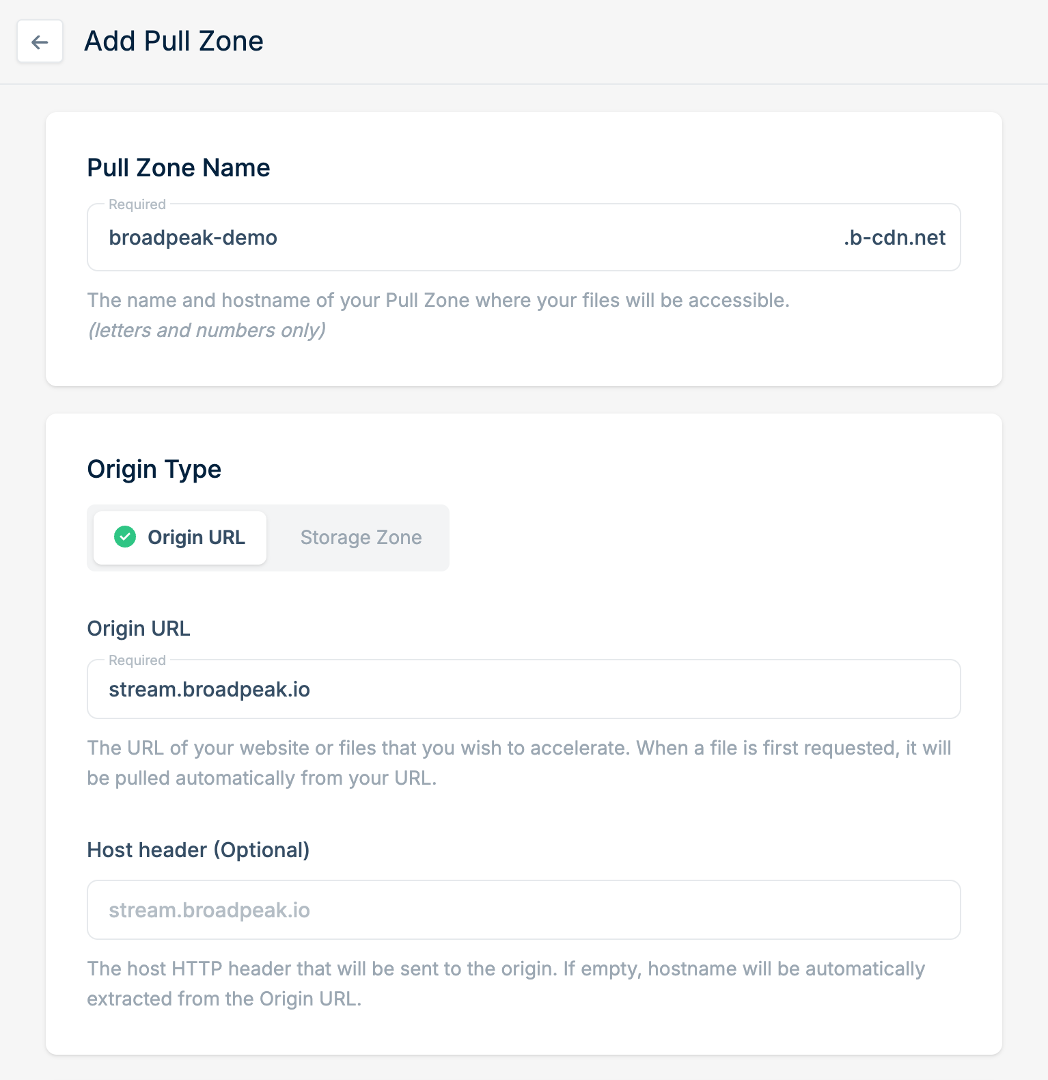
First, head to the Bunny.net Dashboard, **Click on the “CDN” section **on the left menu bar and **click the Add Pull Zone **button.
-
The first step is to define the Pull Zone name. This will create the name and hostname of your Pull Zone where your files will be accessible.
-
Next we’ll define our default Origin for this Pull Zone. That is: the one that an incoming request will be sent to, in the absence of any behavior being triggered to redirect it elsewhere. So, in our case, that's the server that contains the original content (and in particular the media segments): stream.broadpeak.io. In this case the origin uses the HTTPS protocol, so that's what we'll set the origin to use as well.
-
The last option on this page is to choose your networking tier. In general, Bunny.net suggests that you use their High Volume Tier network, which is geared toward large file and video delivery, however we encourage you to directly see this with your Account Manager from Bunny. This can be changed at a later stage if you wish. After selecting the High Volume Tier network, click on Add Pull Zone to complete the initial set up.
-
You’ll next be taken to a “Custom Installation” page with examples on how to replace “origin.broadpeak.io” with the Bunny URL to start streaming through the Bunny.net CDN. You can Click “Skip Instructions” to proceed to your CDN Configuration page.
Configure Pull Zone
-
If you wish to use your own custom Hostnames, you can go to _General > Hostnames > Add Custom Hostnames _and add them here. After entering a custom hostname, you can create a CNAME with your DNS provide to point a CNAME record for your sub-domain to the Bunny.net hostname of “broadpeak-test.b-cdn.net” in this example.
-
To manage the primary Caching rule, go to Caching -> General -> Cache Expiration Time. From this page, you can set your Cache Expiration time to “Override: 1 hour”. This will set the CDN to cache your files for a 1 hour maximum before expiring. This configuration will work for caching your segment files. We’ll shorten the TTL for Manifest files via the Edge rules in the next step.
-
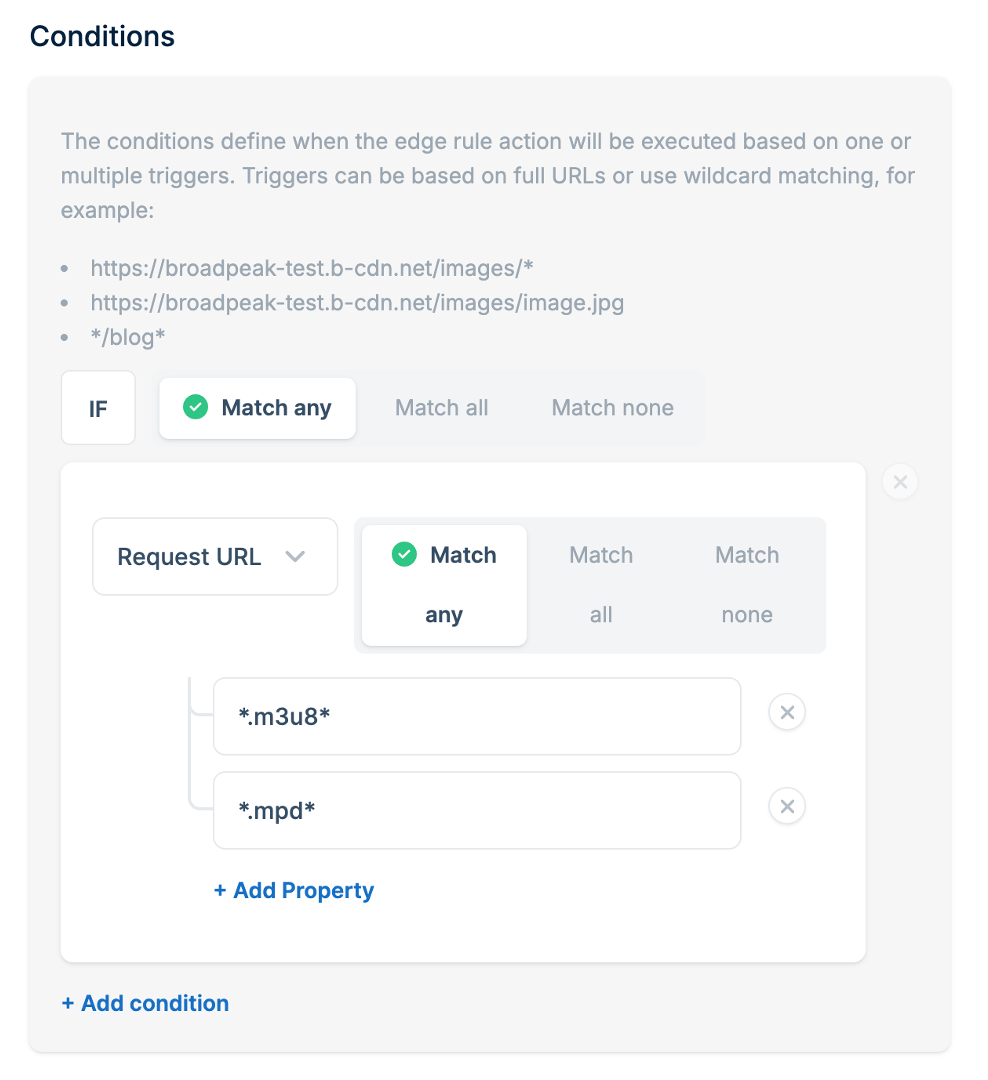
To set specific caching rules for our Manifest files, we’ll go to the Edge Rules section and click on Add New Rule. From there we can Enter a Description of the rule, like “Manifest Caching”. Next you’ll choose the Action and select “Override Cache Time”, and add a value for Cache Time in Seconds (Manifest caching set to “0” so it doesn’t cache) Conditions - Set the “IF” to “Match any”. Use Request URL in the drop down menu. Then place “.m3u8” (for HLS) and/or “.mpd” (for DASH) under the Request URL. Then you can Click Save Edge Rule to create the Edge Rule.
Alternate Content
So far so good, but now we want to handle the alternate content.
When you configure a broadpeak.io service, you'll want to involve other content too. In particular, when working with Content Replacement and/or Virtual Channel services, you will normally want to stitch in content (specifically media segments) that comes from other places, usually different origins.
If that content comes from the same origin (as is the case in our Getting Started examples for Virtual Channel and Content Replacement services), then there's nothing left to do. Your service should be operational.
Often though, the content that is substituted into the live stream will come from different domains. Extending your property configuration to cover those is an extension of the work done so far:
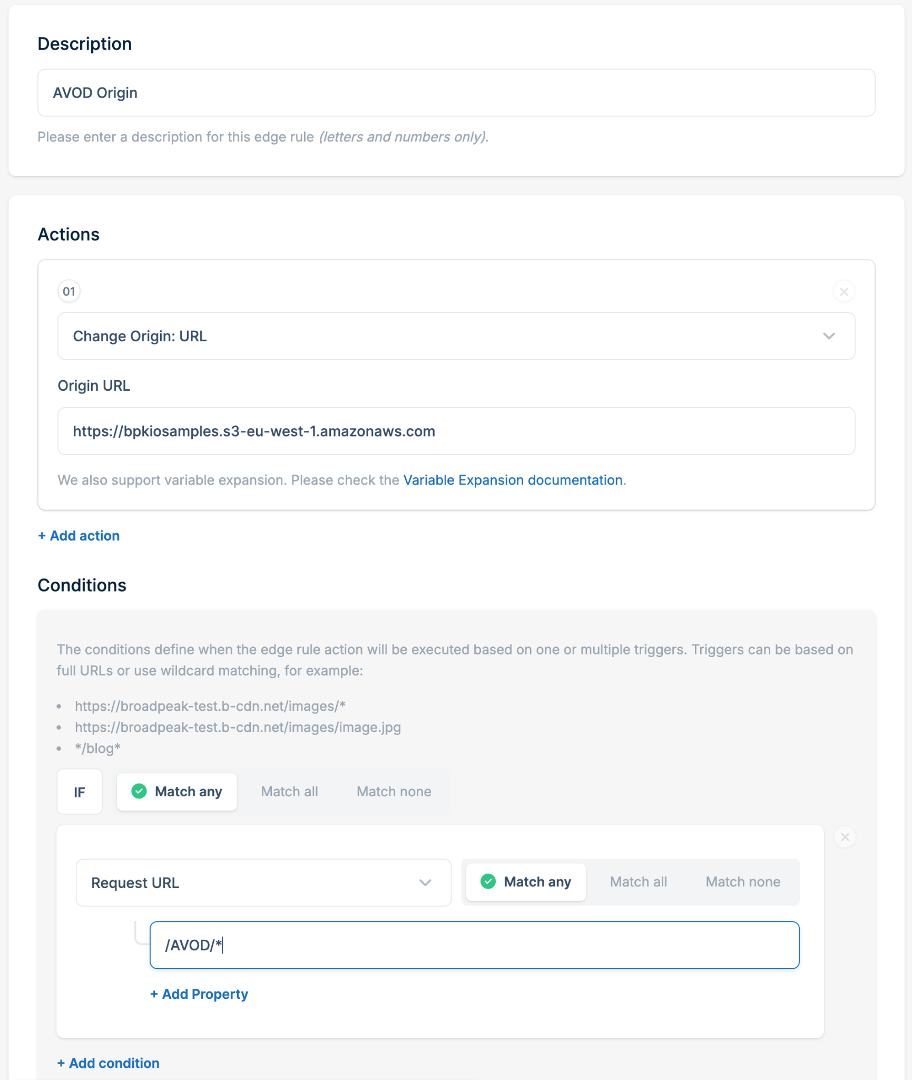
- Add a new Rule with a Criteria that uniquely identifies segments for the substituted content.
- And configure the rule's Behavior to route those requests to the appropriate origin
You'll do that based on the (partial) path to that content. So you need to be able to define a path pattern that uniquely identifies content coming from those alternate origins.
For example, let's imagine that we have VOD assets that sit on an alternate origin, which we want stitched in the stream. Here is one:
By adding it to a slot in the service, the stream output might look like the following:
#EXTM3U
#EXT-X-VERSION:3
#EXT-X-INDEPENDENT-SEGMENTS
#EXT-X-MEDIA-SEQUENCE:1
#EXT-X-TARGETDURATION:8
#EXT-X-PROGRAM-DATE-TIME:2023-10-03T20:14:17.821796+00:00
#EXTINF:4, no desc
live-audio=126470-video=1600215-424091019.ts?bpkio_serviceid=a3eb043e7bf775ded159a8940be5e720&bpkio_sessionid=10c0b51d66-005aea96-dc0b-40d4-8004-090bc0949313
#EXTINF:4, no desc
live-audio=126470-video=1600215-424091020.ts?bpkio_serviceid=a3eb043e7bf775ded159a8940be5e720&bpkio_sessionid=10c0b51d66-005aea96-dc0b-40d4-8004-090bc0949313
#EXT-X-DISCONTINUITY
#EXT-X-PROGRAM-DATE-TIME:2023-10-03T20:14:43.000000+00:00
#EXTINF:8,
../../../AVOD/TOS-original-24fps-1080p/conditioned/video/1600000/ts/segment_0.ts?bpkio_serviceid=a3eb043e7bf775ded159a8940be5e720&bpkio_sessionid=10c0b51d66-005aea96-dc0b-40d4-8004-090bc0949313
#EXTINF:8,
../../../AVOD/TOS-original-24fps-1080p/conditioned/video/1600000/ts/segment_1.ts?bpkio_serviceid=a3eb043e7bf775ded159a8940be5e720&bpkio_sessionid=10c0b51d66-005aea96-dc0b-40d4-8004-090bc0949313
This means that requests for media segments of the alternate content are sent to:
https://[your-hostname.b-cdn.net]/AVOD/…Assuming that all those replacement assets are under the same root folder AVOD, the path pattern /AVOD/* will provide a clean way to differentiate those segments from the original stream segments, and we can create a new behavior in the distribution accordingly. This would also be configured within an Edge Rule, by selecting “Change Origin: URL” as the Action, and setting the Conditions to “Match any”, “Request URL and setting the path in the custom condition text box.
Final Step
For an initial configuration, this ought to do it.
It is now time to activate this new version of the property. After that, you should be able to stream your content, simply by replacing the stream.broadpeak.io part in your service URL with the Bunny.net hostname you selected.
You can even test this in the WebApp, in the preview page for your service.
Updated 21 days ago